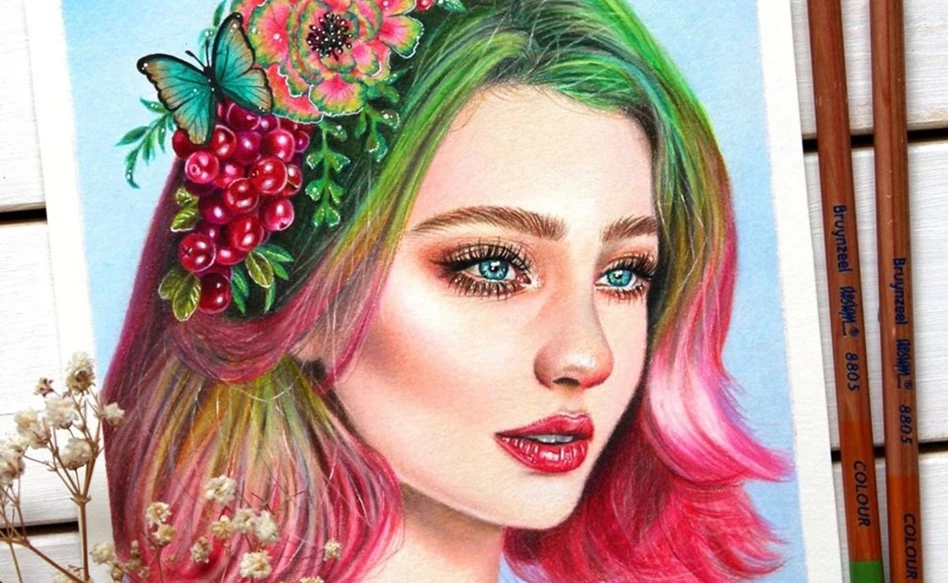
A girl with flowers in her hair, drawing a portrait in colour pencils
Drawing realistic portraits is notoriously difficult to pull off. Have you always wanted to draw a beautiful portrait using coloured pencils? This step-by-step plan will teach you some very useful tips and tricks to practise your portrait drawing skills! Pick out a reference photo you would like to draw and let’s begin!
To make this plan a little easier to follow, we divided the artwork into three parts: the face, the hair and the flower hair accessory.
What you need
- Cotton white paper (180 g/m²)
- Graphite pencil
- Bruynzeel Design colour pencils
- Bruynzeel Expression colour pencils
- Sakura Gelly Roll gel pen in white 05
- Sakura Pigma black fine liner
- Pencil sharpener
- X-Acto knife to scrape out some details
Tips
- Work slowly and in layers, this will give you the most realistic effect.
- Make sure your pencils are sharpened very well, especially when drawing eyelashes, details on the lips and other fine lines.
- For this specific skin tone, I burnished with a white pencil, since the model is very pale.
- Use greys combined with browns instead of black for the shadows on the face to add a natural-looking depth to the skin.
- If you need more help with the blending on a more textured surface, you can always use odourless solvents to melt the colour, especially after the first layers.
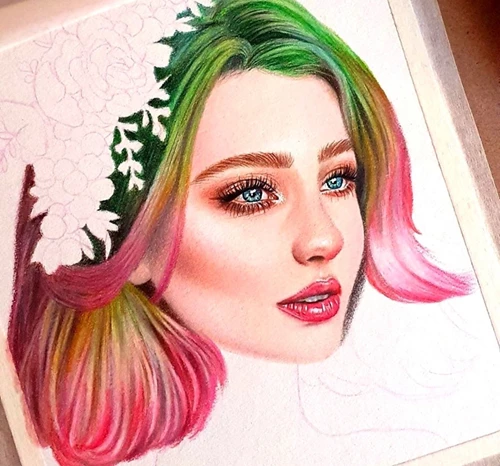
Step 1
I usually start a portrait by making a rough sketch using the graphite pencil. I measure the proportions from the reference photo on my computer. It doesn’t have to be exact, but if you want to draw a relative, friend or a celebrity, I suggest using the grid method to make sure the proportions are correct.
Switching to the coloured pencils, I start with the eyes. I select colours that are similar to the colours in the reference picture and add the details. I used Bruynzeel Design colour pencils in no. 75, 70, 38, 31, 18, 71, 51, 55, 73, 01, 10 and Bruynzeel Expression colour pencils in no. 750, 751, 717, 718, 757, 714, 733, 742, 732 for the face.

Step 2
As I continue to work on the skin around the eyes, I start filling in the nose and cheeks as well. For paler skin tones, like the one in my reference photo, I choose pale colours like peaches, pinks and whites. If the skin is darker, I switch to browns, ochres and earth reds.

Step 3-4
Now, let’s add blush and contour. Make sure to preserve the highlights on the cheekbones, that makes it easier to accentuate them using the white pencil afterwards. Always use light strokes and layer your colours for a seamless blend. After that, I draw details on the lips and eyebrows and then add light freckles and moles using light browns to make the skin look more realistic.

Step 5
The hair needs quite a bit of attention as well, since hair is usually the most difficult part to recreate realistically. Do not stress on individual hairs just yet, try to work on strands and work on one section at a time.
It is important to add details to make the hair more realistic, like highlights where the hair is shiny and lowlights where the hair is darker or in the shadows, especially at the roots.
I used Bruynzeel Design colour pencils in no. 60, 19, 71, 38, 31, 61, 10, 01 and Bruynzeel Expression colour pencils in no. 771, 756, 723, 755, 725 for the hair.

Step 6
I also love adding stray hairs, or so-called “fly-aways”, because it gives the hair a more realistic look. I use an X-Acto knife or something else sharp to scrape the pigment off the paper and reveal the white of the surface, giving the impression of small hairs. I use this trick for the lips as well, and the fine lines under the eyes. Be careful though, if there is not enough pigment on the paper, this technique will not work, and you will only end up damaging the surface.
Step 7
Now onto the flower hair accessory. Some colourful and vibrant elements to offset the smoothness of the skin will make your artwork even more interesting. If you are not patient with drawing flowers and/or butterflies, you can just stick to a simple portrait.
I used Bruynzeel Design colour pencils in no. 31, 38, 71, 60, 62, 46, 10, 63 and Bruynzeel Expression colour pencils in no. 709, 725, 714, 756, 725 for the hair accessory. The white Gelly Roll gel pen and black Pigma fine liner are very helpful here as well, to add light reflections and enhance contrast by creating shadows.

Step 8
Lastly, I colour in the background. For this I used Bruynzeel Expression colour pencil in 742 and Bruynzeel Design colour pencil in 01.
And that’s it! We hope you enjoyed the process and share your result with us using #RoyalTalens!
This wonderful step-by-step plan was made for Royal Talens by Alexandra Zeres (@alexandra.zeres.art).

Other step-by-step ideas

Drawing a turtle with Ecoline Duotip
Step-by-step plan

Drawing a Japanese beetle
Step-by-step plan

