Drawing a turtle with Ecoline Duotip
Ecoline Duotip pens contain concentrated watercolour paint. These brilliant watercolours in combination with the two different nibs give you the freedom to make fine or broad lines and to colour larger areas. You can use them on their own or in combination with water to create beautiful watercolour effects and smooth colour transitions.
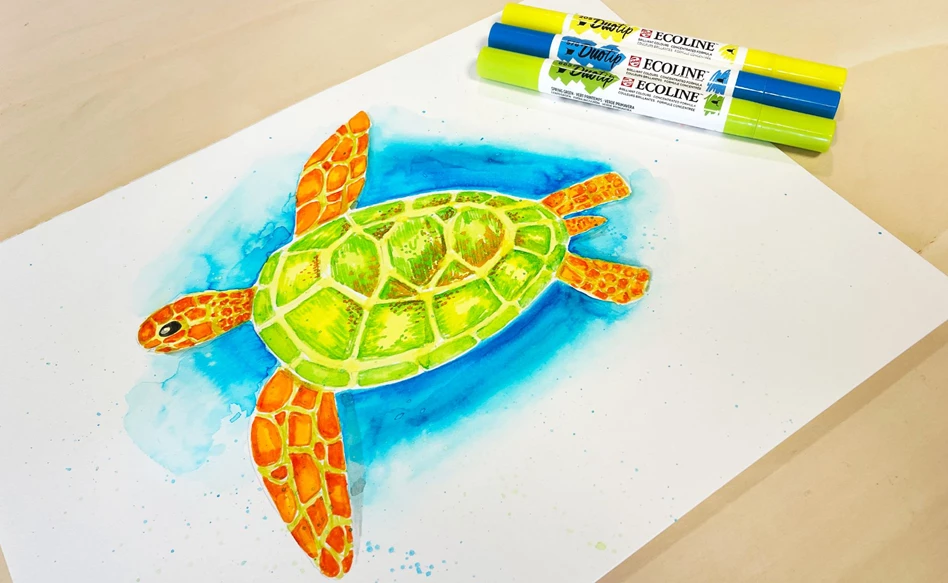
In this step-by-step plan, Sigrid (@studiosigrid on Instagram) shows us the versatility of the new Ecoline Duotip by creating this colourful turtle illustration!
What you need
- Ecoline Duotip markers in the colours 205 Lemon Yellow (Primary) – 665 Spring Green – 601 Light Green – 236 Light Orange – 237 Deep Orange – 578 Sky Blue (Cyan) – 700 Black
- Ecoline watercolour paper
- Bruynzeel graphite pencil in 1B
- Talens Art Creation round synthetic brush
- Water
- Eraser
Step 1
Draw a light sketch on the Ecoline watercolour paper. Create the outlines of the turtle and make sure to define the different areas of the turtle’s shell and body. If you’re having a hard time drawing your own turtle, try finding a reference photo online. Make sure to keep the lines of your sketch nice and thin so you can still erase them later.

Step 2
Colour in the different parts of the turtle’s shell. To do this, we used the following colours: 205 Lemon Yellow – 665 Spring Green – 601 Light Green and 236 Light Orange as an accent colour.
Build the colour of the shell in layers. To ensure the colours are still easy to blend and the Ecoline has not dried yet, we will be working on small areas at a time. Use the broad nib of the yellow Duotip to colour in the small shape. Then add accents to the base colour using the fine nib of the Spring Green marker. To complete the square, add small accents to the sides of them with the fine nib of the Light Green Duotip. Now you can add small dots using the fine tip of the Light Orange Duotip.
Using this technique, you can create a blended effect, but still retain texture in your drawing. To fill in the small areas on the side of the turtle’s shell, use the lighter green shade and quickly add the spring green marker on top. This helps you to create a smoothly blended colour.
Fill up the space between the squares using the yellow marker. The large nib of the Duotip makes it easy to quickly fill those spaces.

Step 3
To colour in the body, we used 236 Light Orange and 237 Deep Orange. Once again, we will be working in small areas. Use the Deep Orange marker to outline the outer rims of one of the shapes in the turtle’s flipper. Make sure to make one side a little thicker to add dimension. Then use the Light Orange marker on the entire shape to make the colours blend with each other. Repeat this process for all the shapes on the turtle’s body.
Fill in the spaces in between the shapes using the colour 665 Spring Green. Colour in the eye using the fine nib of the Duotip in 700 Black. Once all the paint has dried, erase the pencil lines.

Step 4
Add the background in small areas as well. Use the broad nib of the Duotip in 578 Sky Blue to outline the outside of the turtle’s shell. Using a wet paint brush, you can lift a bit of the colour from the paper and slowly blend it out towards the outside of your drawing. Rinse out your brush with clean water before adding the next stroke to create a soft gradient.

Step 5
Add some splashes to complete your drawing. Use a separate piece of paper and add a small blue square. Pick up some of this blue colour with your wet brush. Now tap the brush lightly to add splashes to your drawing. You can do this by tapping the brush onto one of the markers to help them spread nicely.

And that completes your turtle. Have fun drawing! If you make your own version, show us on social media using #RoyalTalens. We would love to see it!
This step-by-step plan was made by Sigrid Claasz (@studiosigrid on Instagram). Check out her page for more colourful illustrations!

Other step-by-step ideas

Drawing a turtle with Ecoline Duotip
Step-by-step plan
Drawing a Japanese beetle
Step-by-step plan


