![Festive table runner](/contentassets/cf6da1d6d8c24789954655915e22ed1e/table-runner-overview.png?width=948&height=583&bgcolor=white&format=webp)
Festive table runner
It is almost time for the annual dinners with our loved ones. Such dinners ask for pretty table decoration. In this step-by-step-plan we will show you how you can make and decorate your own table runner and napkins with a pretty Christmas design.
What you need
- Talens Art Creation Textile Opaque
- Talens Art Creation Textile
- Pattern paint roller
- Mixed Media paper
- Sponge sticks
- Scissor
- Textile table runner
- Textile napkins
Step 1
This is what you will need.
![Step 1](/contentassets/cf6da1d6d8c24789954655915e22ed1e/step-1.jpg?width=500&bgcolor=white&format=webp)
Step 2
Cut out your own stencils using Mixed Media paper.
![Step 2](/contentassets/cf6da1d6d8c24789954655915e22ed1e/step-2.jpg?width=500&bgcolor=white&format=webp)
Step 3
Use a flat surface and apply Textile Opaque white paint to it.
![Step 3](/contentassets/cf6da1d6d8c24789954655915e22ed1e/step-3.jpg?width=500&bgcolor=white&format=webp)
Step 4
Take a pattern roller and add paint to it, then apply it to your textile surface.
![Step 4](/contentassets/cf6da1d6d8c24789954655915e22ed1e/step-4.jpg?width=500&bgcolor=white&format=webp)
Step 5
Use a smooth roller to add a different effect.
![Step 5](/contentassets/cf6da1d6d8c24789954655915e22ed1e/step-5.jpg?width=500&bgcolor=white&format=webp)
Step 6
Take your stencils and a sponge stick to apply the black paint. If you want to make sure that you don't stain the table runner, use a new stencil for each tree.
![Step 6](/contentassets/cf6da1d6d8c24789954655915e22ed1e/step-6.jpg?width=500&bgcolor=white&format=webp)
Step 7
Do the same with the textile napkins. You can use a different colour paint, for example green.
![Step 7](/contentassets/cf6da1d6d8c24789954655915e22ed1e/step-7.jpg?width=500&bgcolor=white&format=webp)
Step 8
To add some glamour, you can use a gold or silver colour paint. Let it dry for 30 minutes. Iron for 5 minutes to fixate.
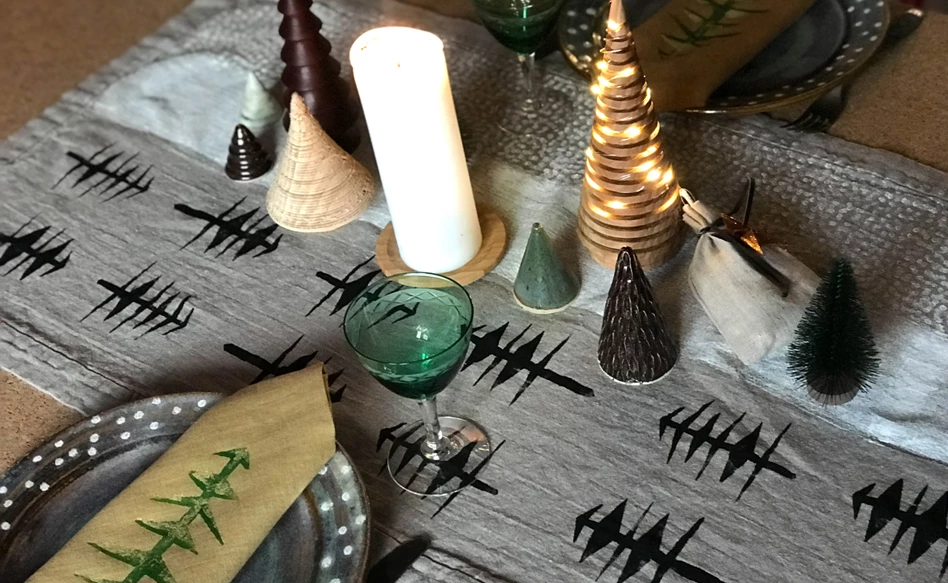
![Step 8](/contentassets/cf6da1d6d8c24789954655915e22ed1e/step-8.jpg?width=500&bgcolor=white&format=webp)
Step 9
Set the table using your original table textile and other festive decorations. Enjoy!
![Step 9](/contentassets/cf6da1d6d8c24789954655915e22ed1e/step-9.jpg?width=500&bgcolor=white&format=webp)
Get inspired with more textile ideas
![DIY Halloween trick or treat bag](/contentassets/2a5265801bd2448981de62dc5c87d25b/diy-halloween-bag-summary.png?width=409&height=174&bgcolor=white&format=webp)
DIY Halloween trick or treat bag
Step-by-step plan![DIY festive pillowcase](/contentassets/c0c009dd510f4e57a6ea8b3fb6425949/tac-trend-set-pillowcase-summary.png?width=409&height=174&bgcolor=white&format=webp)
DIY festive pillowcase
Step-by-step plan![DIY festive table textiles](/contentassets/133bd6d8ef9b4a71a0e1924c8a60d304/tac-trend-set-table-textile-summary.png?width=409&height=174&bgcolor=white&format=webp)
DIY festive table textiles
Step-by-step plan![3 fun DIY projects with fabric markers](/contentassets/ea4f94e6d1084d38ba9801ce981284bb/diy-with-fabric-markers-summary.png?width=409&height=174&bgcolor=white&format=webp)