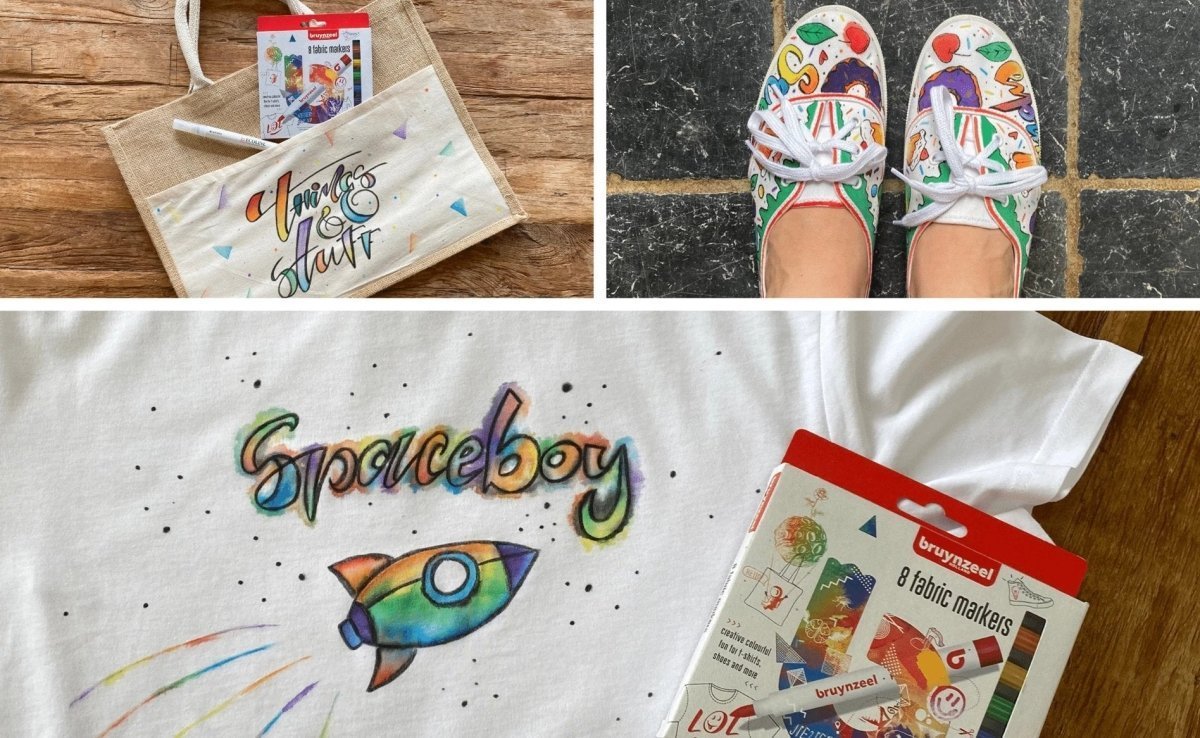
In this step-by-step plan, Maureen shows you how to create your own colourful design on a canvas tote bag, a T-shirt and some canvas sneakers using Bruynzeel fabric markers. She also gives you some great tips on how to blend these intense colours, so let’s get started!
Before starting, wash the fabric without fabric softener and let it dry completely. Use an empty sheet of sketching paper to create your design. Once you’re happy with the design, you have three options to transfer it to the fabric:
Draw your design directly onto the fabric using a graphite pencil.
Place your design underneath a layer of the fabric you’ll be using. If the textile is thin enough, the design will show through it. Trace the design using a graphite pencil.
Use a soft graphite pencil to colour in the back of your design to create a sheet of carbon paper. Place the coloured in side onto the fabric and trace your design with a graphite pencil to transfer it. This method is great if you use a thicker fabric that isn’t see-through.
Trace the outlines of your pencil design
Step 2
Now it’s time to trace the outlines of your pencil design using the black fabric marker. Since the fabric markers are very intense, they may bleed through the fabric. Place a sheet of plastic (a plastic folder or placemat, for example) between the layers of fabric to protect the other side from the ink.
Once you’re happy with the outlines of your design, you can set them using an iron. This step is very important, since we will be using multiple colours and a blender to complete the design in the following steps. If the black outlines aren’t set, they will blend in with your colours, making it look quite messy.
CAUTION: Don’t forget to take out the sheet of plastic before ironing and placing it back before moving on to the colouring step!
The most fun part of personalising fabric: colours!
Step 3
If you want your colours to create nice gradients and blend with each other, don’t use them directly on the fabric. The ink settles into the fibres of the fabric very quickly, which makes it impossible to blend the colours later on. For the best blended effect, use a colourless blender pen, like the one from Ecoline.
Use a sheet of plastic or a plastic palette to prepare your colours. Using the blender, you can now blend out the colours before applying them to the fabric. You can also use the blender to prepare the fabric so it doesn’t absorb the ink straight away.
Blend the colours
Step 4
To blend the colours, make sure the darkest shades are at the top and bottom of your design, then meet the colours in the middle. They should be lightest there to give the most seamless effect. When switching colours, make sure to clean the blender by dragging the flexible tip on a scrap piece of paper until it runs clear.
If your colours aren’t intense enough after blending, you can use the fabric markers directly to add some colour to the outside of your design. You’ll still be able to blend the colours since there’s enough fluid on the fabric already.
Set the colours
Step 5
Once you’re happy with your design, you can set the colours using your iron, just like with the outlines. Again, don’t forget to remove the plastic sheet from between the layers of fabric before ironing. Enjoy your new personalised clothes and accessories!
We hope you liked this tutorial and try it out yourself. This fun step-by-step plan was created by Maureen for Royal Talens. Check her out on Instagram (@maureen_van_scrappiness) to see more DIY and lettering projects (in Dutch)!