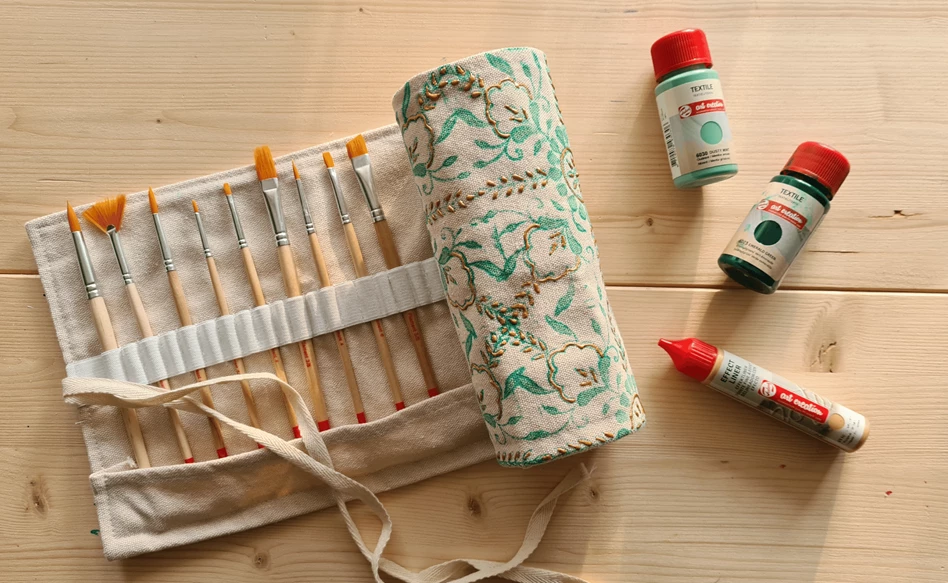
Decorate your art supply bag
Who says your art supply bag should be a neutral, boring colour? Take your brushes with you everywhere you go in this beautiful, patterned brush holder! Find out how you can create your own version using textile paint and block print stamps in the step-by-step plan below.
The techniques described can also be applied to any other fabric item, like tote bags, shirts, pillowcases, you name it! Use your favourite colours and patterned stamps or create your own design with a brush. Have fun trying this out at home!
What you need
- Talens Art Creation Textile Paint
- Talens Art Creation Effect Liner in Pearl Gold
- Fabric item (e.g., this Talens Art Creation canvas brush holder)
- Block print stamp
- Talens Art Creation tear-off palette
- Paint roller
- Brush for details
Tips
- Make sure your fabric item is made of at least 50% cotton or another natural fabric. Textile paint does not adhere as well to synthetic fabrics.
- Wash your fabric without fabric softener before starting, this will help the textile paint adhere to the fabric better.
- When decorating a tote bag, t-shirt or any other item with two sides, use plastic or parchment paper in between the layers of fabric to prevent the paint from bleeding through.
Step 1
Pour some of the textile paint onto the tear-off palette. Add the paint to your stamp using the paint roller. Put the stamp onto your fabric with the painted side down and press firmly. Repeat this as many times as you need to cover the empty spaces completely. Let the paint dry before moving on to the next step.

Step 2
Colour in your pattern using a small brush and a different colour of the textile paint. We decided to go for a lighter green to compliment the dark green outlines of the pattern. Let dry for 30 minutes.

Step 3
Once the paint has completely dried, you can set it using an iron and some parchment paper (baking paper). Iron over the print for 5 minutes to set the paint.

Step 4
Now that the paint has set, it is time to decorate your print! We used an effect liner in the colour Pearl Gold to add some shiny accents to the pattern. Effect liners also offer a wonderful 3D effect to make your work stand out more! Let your brush holder dry overnight before using it.

Step 5
That completes your personalised brush holder! We hope you liked this tutorial. If you try something like this yourself, let us know by sharing it using #RoyalTalens, we would love to see your creation!

Get inspired with more textile ideas

DIY Halloween trick or treat bag
Step-by-step plan
DIY festive pillowcase
Step-by-step plan
DIY festive table textiles
Step-by-step plan
