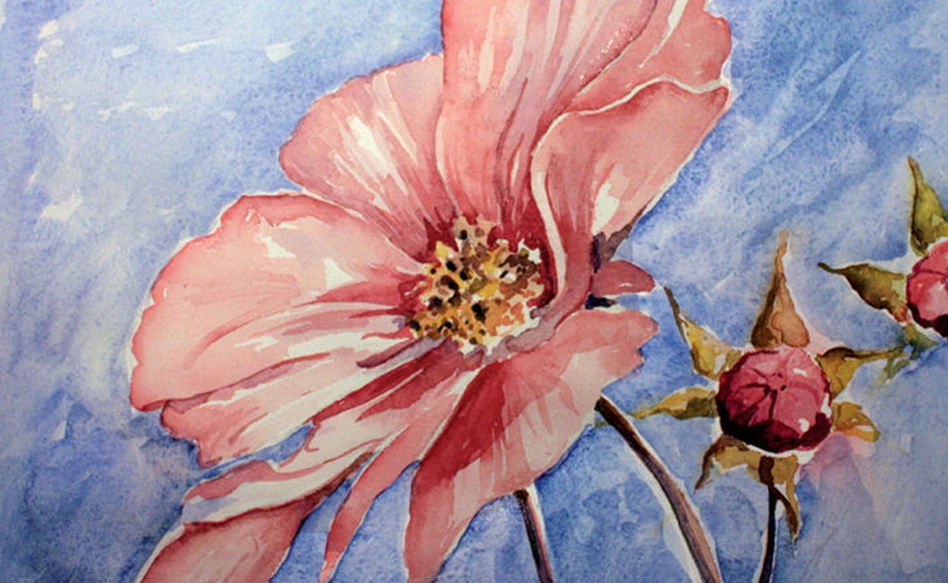
Flower
Watercolouring is painting with large amounts of water. The more water, the lighter the colour. Wherever colours are mixed in the step-by-step plan plenty of water is always added. Begin by filling in the lighter colours and leave unpainted the areas you eventually wanted to be white. You then work with increasingly dark colours.
Allowing work to dry thoroughly between stages (if necessary with the aid of a hair-dryer) prevents colours running into each other. Have you used too much paint? Soak up as much as possible with a clean, dry brush or tissue. Hold the brush more or less vertically when applying details and flatter when washing large areas. Hold the brush clean while working to avoid unwanted colour mixtures.
Before you start, go through all the stages.
What you need
- Talens Art Creation watercolours set
- Watercolour paper
- Talens Art Creation set of brushes for watercolour
- Pencil or charcoal
- Kneadable eraser to fade any lines or rub them out completely
- Mixing tray or white plate onto which to mix the paint
- Water for thinning paint and cleaning brushes during and after painting
- Tissues or sponges for absorbing excess paint
Step 1
Lightly copy the flower using charcoal or pencil.

Step 2
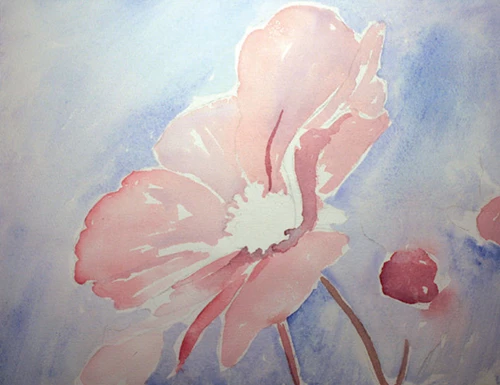
Paint the first layer using water colours thinned with a lot of water. Paint the leaves pink/red using alizarin crimson and ultramarine. For the background use ultramarine thinned with plenty of water.
Step 3
Make the heart of the flower light by using yellow and leaving some areas white. Paint the buds olive green using dark green mixed with yellow ochre. Give the background a second layer using ultramarine that has been thinned less. The first layer must be dry. Add accents in the leaves by using the same colours but less thinned.

Step 4
Finish off the flower with some details. Paint small dots/specks in the heart of the flower (burnt umber with a tiny amount of scarlet and ultramarine). Also use yellow ochre for the specks in the heart. Paint lines in the leaves (alizarin crimson mixed with a tiny amount of burnt umber and ultramarine). Create depth around the heart of the flower using dark pink (alizarin crimson mixed with a tiny amount of burnt umber and ultramarine). Paint shadows on stems,
buds and leaves (alizarin crimson and mixed with a tiny amount of green).

Other step-by-step plans with watercolours

Easy Christmas illustrations
By Trine Holmvard and Gitte Klausen

Heda's still life in Van Gogh water colours
Step-by-step plan
Sumo wrestler
Step-by-step plan
Loosely painted flowers
Step-by-step plan