Easy Christmas illustrations
Cosy up inside with a little watercolour and doodle project in the long, cold December days! We, Trine Holmvard and Gitte Klaussen from @KreativLivsstil, created an easy step by step guide for you to make cute little Christmas art without having to be a master of watercolours or drawing. We invite you to follow along!
Let the whole family join in or maybe you need to make a little time for yourself? Whichever way you celebrate, "hygge" is a big part of what makes Christmas great. With all the lights, warm drinks, home cooked and baked goods, loving thoughts and so on. Sometimes it tends to get lost in all the fuss, but it really has its purpose in the dark cold December month and therefore it is so important to make room for it. This DIY-project is the perfect start!
All you need for this cosy Christmas project is:
- Small pieces of watercolour paper
- Watercolours
- A pencil
- Fineliner
- Markers or gellyrolls for decoration
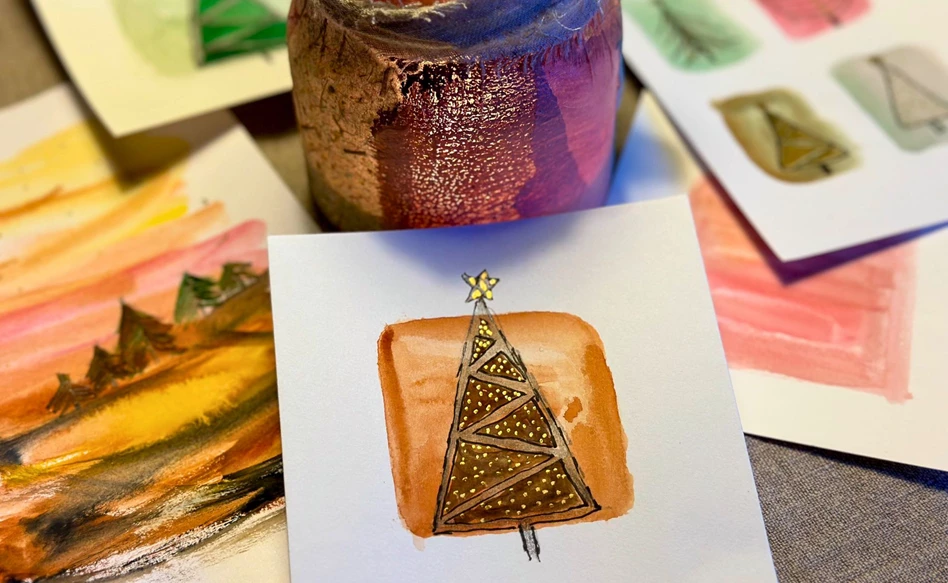
Step 1
Using any colour you like, make a square on the paper with watercolour. Let this dry completely. Then, take your pencil and draw a tree or any other object that comes to mind when you think about Christmas. A present, a bow, a snowflake, a star, you name it!
Once you are happy with it, take your fineliner and trace around the pencil to emphasize the shape.

Step 2
Once the fineliner is dry—this will only take a few minutes—take out your watercolour again. Fill in the shapes you created in any colour you like. We recommend a darker colour than the background to make it stand out.
Once that is dry, you can decorate it with metallic markers or glitter gelly rolls. This is the most fun part!

Your fantasy is the limit!
You can also make several small squares in different colours with all kinds of Christmassy objects inside. Your fantasy is the limit!
Go for the colours that make you happy or make you think of Christmas. Maybe it’s the happy festive colours or maybe you prefer to take a more monochromatic or natural colour approach… it’s totally up to you and the spirit you’re in.
Finally, remember to send some of the cards you make in order to share the joy of creativity!
This blog was created by Trine Holmvard and Gitte Klaussen from KreativLivsstil.

Other step-by-step plans with watercolours

Easy Christmas illustrations
By Trine Holmvard and Gitte Klausen

Heda's still life in Van Gogh water colours
Step-by-step plan
Sumo wrestler
Step-by-step plan
Loosely painted flowers
Step-by-step plan