Royal Talens respects the privacy of your information

We use cookies to anonymously analyse and improve your use of our website so that you get a flawless and optimized website. 

Find out more on our cookie page and privacy statement.

Functional cookies ensure that you get an error-free and optimized website.
These cookies are used to tailor advertisements to your interests, both on royaltalens.com and on other websites. They also offer the possibility of making newsletters relevant to you personally.
Social media cookies ensure that you can post comments and share information with your friends and / or your network.
Painting an eye
Step-by-Step

Painting an eye

Let’s paint an eye together.

For this painting I wanted to use as few supplies as possible, so you won’t have to go out and buy something new. You’ll need only 4 colors and I bet you already have them. It’s white, red, yellow and black. The palette that we’ll be using today was created by a famous Swedish artist Anders Zorn.

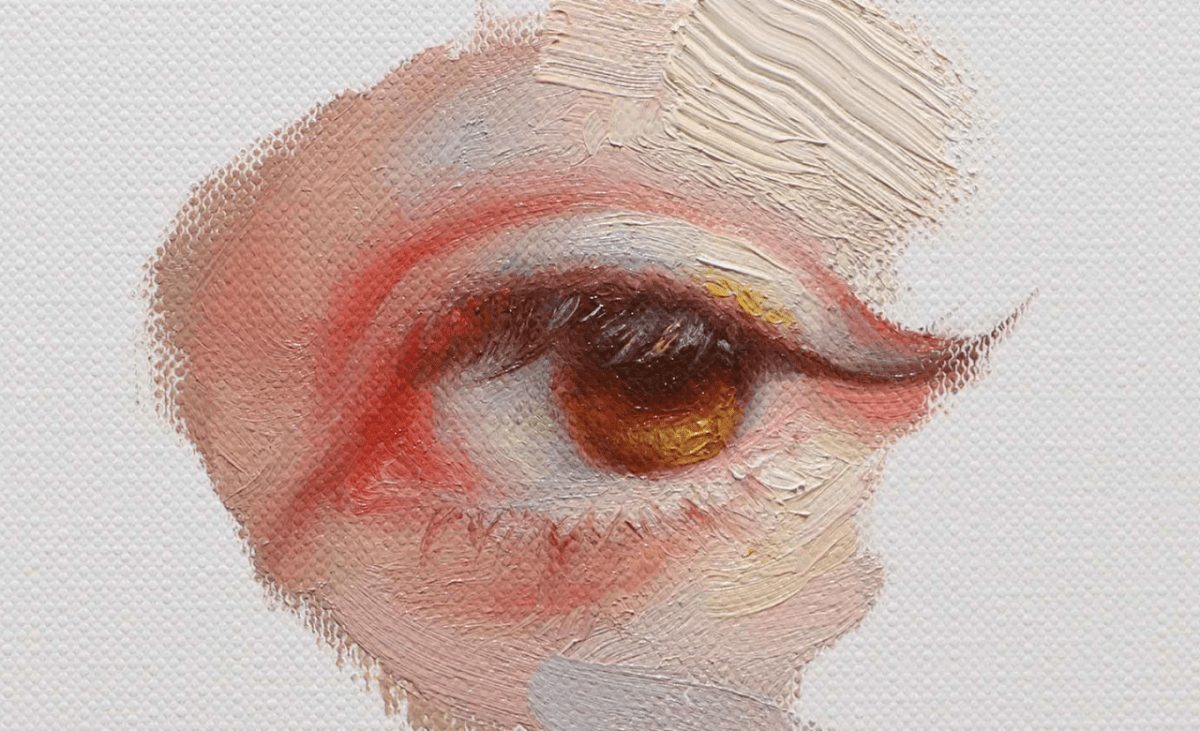
I’ll be using oil paints, but you can also try acrylics or gouache. Your result may vary depending on the saturation of your red and yellow. However, the aim of this lesson is not to create a perfect copy of my painting but to show you how much you can do with only 4 colors.

What you need:

Tips

  • Before you start, go through all the steps.
  • If you want to work without solvents and produce a similar end result, you can work with Cobra water-mixable oil paint.
  • You also can try acrylic or gouache for this step-by-step plan
  • If you don’t have Ivory Black (701) – you can take any other black and add some blue to it (any that you have!) and you’ll get needed grey-blue tint.
  • Brands above can also be other brands f.e. Van Gogh.

Before we start

You need to prepare mixes of colours: light, medium and dark.

The darkest one is mix of Ivory black (701) and Cadmium Red Light (303)
The middle –Cadmium Red Light (303) and Yellow Ochre Light (228)
And the lightest is the most yellow. Everything else we’ll be mixing out of these colors. Also, you can prepare 3 different values of Ivory black (701) mixed with Titanium White (118)

Before we start

Step 1

The first step is to make an outline.

I’m using a brown paint (black + white + yellow + red) and a little bit more diluent than usual.

Step 1

Step 2

Let’s make it simple and apply light, medium and dark colors.

Step 2

Step 3

It’s time to add some details. We can make the left side looking warmer by adding some red and yellow to our basic middle color mixture. The transitional colors between light and medium I create by mixing them together.

Some white + a bit of ivory black will help us to add coolness to the transition between light and medium.

Step 3

Step 4 - 7

More details! Let’s repeat the same things that we did before – mix two colors that are next to each other on our palette and add it to our eye.

Step 4 - 7

Step 8

It’s enough to start the most intriguing part of the process – blending. I take an old fluffy brush (a round synthetic one). It’s a good idea to experiment with the size of the brush. I have a rule – if you can paint it with a bigger brush – use it. The bigger the better.

You need to smooth the lines between two colors. It should be really easy. If you feel that it’s not – mix more transitional colors and add them to the area that you are working on.

The next step is when you can have fun and turn on your creative side. Take a big brush (hard, like a bristle one), or fan brush, or a palette knife – anything that you want to and work on borders of our painting.

Step 8

Step 9

I’ve added two brushstrokes (that’s how creative I am :) ) on top of the eye.

Eyelashes. Not my cup of tea. Usually, I paint them using a tiny brush lash by lash making them darker at the roots and lighter at ends. This time I wanted to experiment and use a fan brush. It’s definitely much faster but you still need to add details on top with a usual brush. The same thing I did with lower lashes. The only difference is that I was using a much lighter paint.

And we are done! I hope that this tutorial was useful. Keep working and don’t forget to have some fun!

Made for @royaltalens.eu by @zarinasart artist

Download the PDF with instructions
Step 9

Other step-by-step plans with oil colour