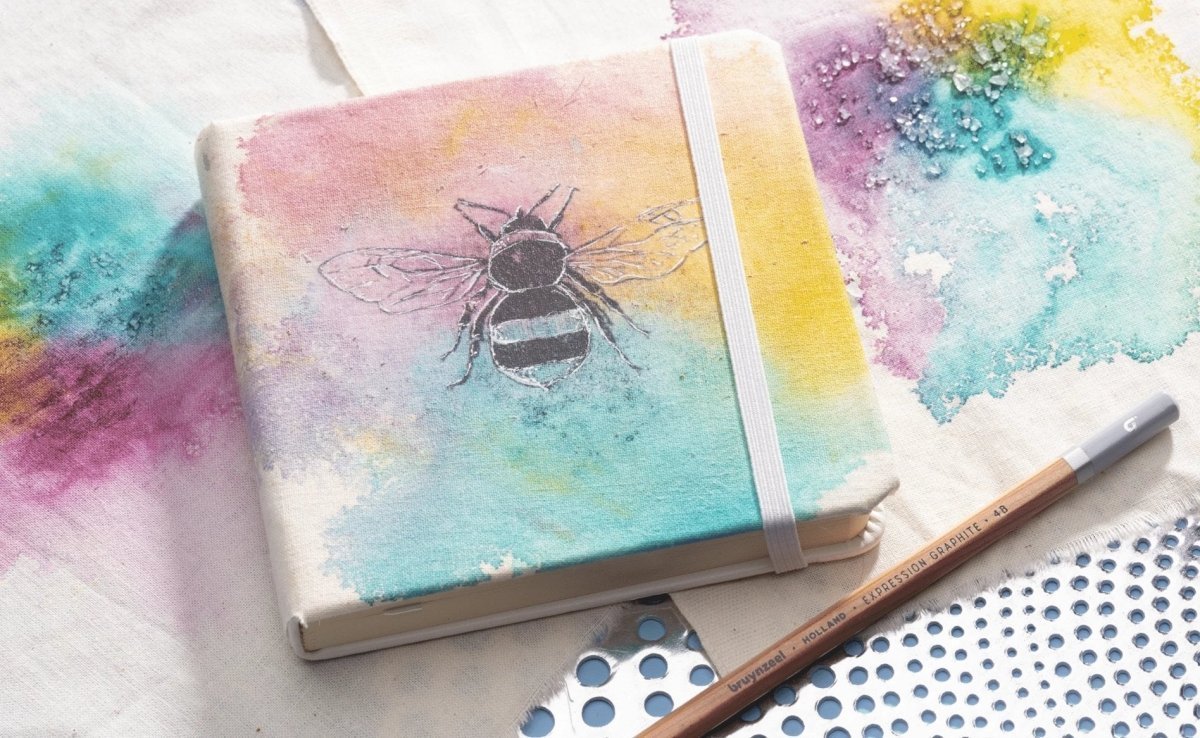
Bee notebook cover - Royal Talens

What you need

  • Fabric
  • Talens Art Creation sketchbook
  • Talens Art Creation Textile Silk
  • Ecoline pipettes
  • Spray bottle with water
  • Coarse salt
  • Heating tool (optional)
  • Scissors
  • Amsterdam Photo Transfer Gel
  • Soft synthetic brush
  • Printed image
  • Ink roller (optional)
  • Sakura Gelly Roll in white
  • Talens Art Creation Effect Liner in Diamond Glitter

Tips

  • Use a natural fabric like cotton or linen, as the Textile Silk will not adhere well to synthetic fabrics.
  • Wash your fabric without fabric softener before starting, this will help the dye absorb into the fabric better.
  • The image transfer works best with a laser-printed picture.
Cut your fabric to match the size of the front cover of your sketchbook.

Step 1

Cut your fabric to match the size of the front cover of your sketchbook. You can also choose to make it double the size to match the entire cover of the book if you want a design on the back and side as well.

Wet your fabric

Step 2

Wet your fabric and squeeze the excess water out so the fabric is damp, not completely wet anymore. Use the pipette to drop a few drops of the textile silk onto the fabric. You can add more water for a more blended or runny effect.

Sprinkle some salt onto the dye

Step 3

Sprinkle some salt onto the dye. The salt will absorb some of the dye to create a subtle dotted effect. Carefully dry the dye with a heating tool (e.g., a blow dryer). If you accidentally blow away the salt, it will leave streaks, which is also fun to try out, but it depends on what you want your design to look like.

You can also leave it to dry overnight if you do not have a heating tool.

The transfer of your printed picture

Step 4

Once your fabric has dried, we can move on to the transfer of your printed picture. We chose a picture of a bee, but you can use any image you like! The image should be placed faced down on your fabric, so if you want to work with text, remember to mirror it before printing! The image transfer will work best with laser-printed images.

Use your scissors to cut out the image you want to transfer. Coat the image with the Photo Transfer Gel using the soft brush while making sure not to coat the back of the picture.

Lay it face down on the fabric and press it on firmly.

Step 5

After the image has been evenly covered with the gel, lay it face down on the fabric and press it on firmly. You can also use an ink roller to make sure the image is evenly pressed down. Let it dry completely either using the heating tool or by letting it dry overnight.

Wet it again using the spray bottle with water.

Step 6

Once your image has fully dried, wet it again using the spray bottle with water. This allows you to rub the paper off the image. Continue rubbing the paper until the image is completely visible. Add another coat of the Photo Transfer Gel to protect your image and let it dry once more.

Complete your design!

Step 7 & finish

Now your image is ready to be decorated using the white Gelly Roll and Effect Liner! Have fun adding highlights and details. We used the Effect Liner in the shade Diamond Glitter to add a little sparkle to the wings of the bee and the white Gelly Roll pen to highlight some of the lines of the image.

And that completes your design! Glue the fabric onto the cover to finish your personalised sketchbook. Have fun experimenting with different colours and prints to create your own design on any sketchbook or notebook. If you try to make something like this, let us know by sharing it using #RoyalTalens. We would love to see it!

Related blogs

Bruynzeel  Sticker Paint - Royal Talens
Decorative paint techniques

Painting stickers with sticker paint

Create fun, glossy stickers with the Bruynzeel sticker paint set. Perfect for windows, vases, jars, mirrors and more. The handy...
Blob paint techniques - Royal Talens
Decorative paint techniques

Blob paint techniques

Not sure where to start with blob paint? Have a look at the techniques described for more details and ideas.
Making a vintage tray - Royal Talens
Decorative paint techniques

Making a vintage tray

Add a vintage look to your home decor with this upcycled tray! In this video we show you how you...
Painting on a glass bottle - Royal Talens
Decorative paint techniques

Decorating glass bottles

Add some colour to your home décor with a hand-painted vase! In this video, we show you how to use...
Turn a cork coaster into a message board - Royal Talens
Decorative paint techniques

Turning a cork coaster into a message board

Transform your cork coasters from indistinguishable to unique message boards! In this video, we show you how to create your...
Painting Happy Stones - Royal Talens
Decorative paint techniques

Painting Happy Stones

In this step-by-step plan, we will show you three ways to turn ordinary stones into Happy Stones: with paint, Crackle...
Metallic design on Glass - Royal Talens
Decorative paint techniques

Painting drinking glasses

Add a personal touch to your clear drinking glasses. Create your own glass design using stamps, stencils, tape for clean...
Making Glass look matt - Royal Talens
Decorative paint techniques

Creating a frosted glass

Frosted glass is usually produced by sandblasting or acid etching clear glass, but did you know you can achieve the...