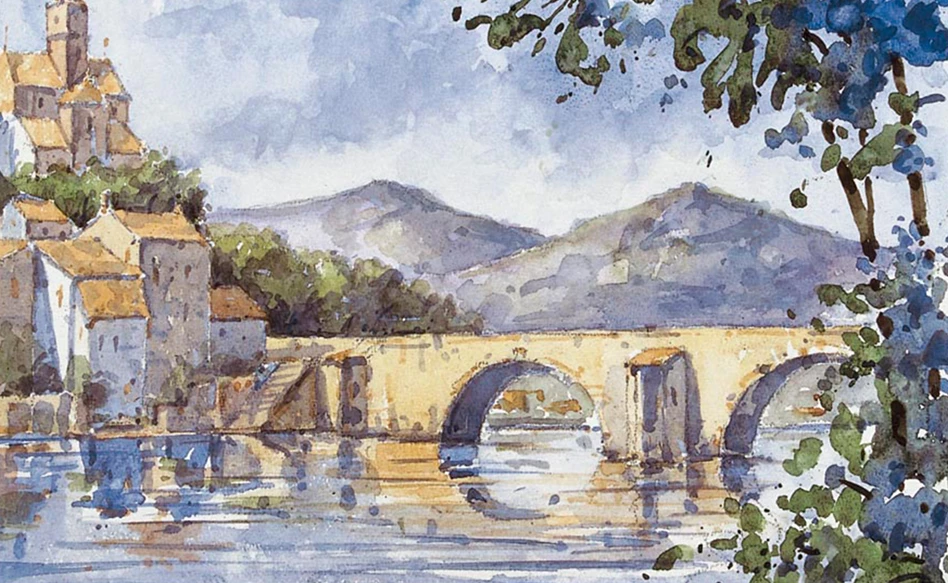
Bridge
Watercolouring is painting with large amounts of water. The more water, the lighter the colour. Wherever colours are mixed in the step-by-step plan plenty of water is always added. Begin by filling in the lighter colours and leave unpainted the areas you eventually wanted to be white. You then work with increasingly dark colours.
Allowing work to dry thoroughly between stages (if necessary with the aid of a hair-dryer) prevents colours running into each other. Have you used too much paint? Soak up as much as possible with a clean, dry brush or tissue. Hold the brush more or less vertically when applying details and flatter when washing large areas. Hold the brush clean while working to avoid unwanted colour mixtures.
Before you start, go through all the stages.
What you need
- 6 colours of Talens Art Creation watercolour: yellow (200), scarlet (334), alizarin crimson (326), burnt umber (409), ultramarine (504), deep green (602)
- Talens Art Creation watercolour brushes (polyester)
- Watercolour paper
- Jar of water
- Cotton rag or tissue (kitchen roll)
- Pencil (HB or B)
- Ruler
- Eraser
- Watercolour mixing palette or a number of white dishes for mixing in
Step 1
With an HB pencil draw the 20 squares (marked with blue lines) of the model very lightly on the paper. With paper size 18 x 24 cm, for example, you make squares of 4 x 4 cm, with a paper size of 24 x 32 cm you draw squares of 5.5 x 5.5 cm, leaving enough space round the edges to put the painting in a passe-partout. Now copy the template onto the paper in pencil. For clarity, the drawing of the template you see here has been applied too heavily. Draw as lightly as possible, as dark lines can be a permanent distraction.
Once the sketch is complete, erase the gridlines.

Step 2
Mix ultramarine (504) with a very small amount of burnt umber (409) and plenty of water to make blue violet and use it to paint the shadows of the houses and the bridge, the vegetation and the reflection and movement of the water. Allow to dry thoroughly. Place the pad on the diagonal, with
the top side approx. 5 cm higher.
Prepare 3 tubs/dishes of paint: one with ultramarine (504), one with a weak yellow (200) (= very little paint, plenty of water) and one with violet (ultramarine (504) mixed with alizarin crimson (326)).
Wet the sky section with clean water and allow to soak in for a moment. Apply ultramarine blue in places. The colour will spread out on the wet paper, creating gentle transitions and the shapes of the clouds. Add some of the light yellow to the white of the clouds and above the horizon.
Paint the mountains with the violet while the lower part of the sky is still wet. The colours will run slightly, blurring the outlines and making the mountains seem further away. Add more water for the brighter violet.
The pad can now be laid flat again. Allow everything to dry thoroughly.

Step 3
Mix burnt umber (409), a little yellow (200) and some scarlet (334) with plenty of water to make a light ochre-like/beige colour. Paint the walls of the houses and the bridge (also partly over the blue shadow colour) and the reflection of the water.
Add a little more scarlet (334) and paint the church, the staircase on the left, and the reflection in the water.
Mix deep green (602) with a little burnt umber (409), yellow (200) and water to make a natural green. With this paint the vegetation and the reflection in the water, including over the blue violet shadow colour already applied.
Thin the colour with plenty of water and in places go over the mountains, adding a dab of ultramarine (504) for the view under the bridge.

Step 4
Mix orange from yellow (200), scarlet (334) and water and paint the roofs, the reflection of the bridge, details such as window frames and the suggestion of stones in the bridge (also those of the houses in the views under the bridge).
Again mix a blue violet with ultramarine (504), a little burnt umber (409) and water and reinforce the darkest shadows of the trees, the houses and the bridge (don’t forget details like windows and other accents).
Add more water and reinforce the sky with patches. Use a clean, wet brush, in order to soften the sky a little here and there at the edges.
Paint the water, the shadow on the mountains and lighter details in the houses and bridge.

Step 5
In conclusion, paint the vegetation on the right and the final details.
Mix a natural green from deep green (602), some burnt umber (409), yellow (200) and water.
Paint the large green patches of the leaves. The small patches are created by splashing the paint onto the paper: to do this, hold the brush a few centimetres above the paper and tap the metal of the brush with a finger. The amount of paint on the brush is important for a good result. Practice this on a test sheet first. Do the same with a blue colour, mixed from ultramarine (504), a little deep green (602) and water. Allow to dry thoroughly.
Paint the trunks and branches with a dark, browny-green colour mixed from burnt umber (409), a little ultramarine (504) and water.
Again make a blue-violet colour with ultramarine (504), a little burnt umber (409) and water and accentuate the ripples in the water (especially in the foreground).
Lighten the colour by adding more water and paint some patches of shadow on the roofs and walls of the houses.
Download PDF
Other step-by-step plans with watercolours

Easy Christmas illustrations
By Trine Holmvard and Gitte Klausen

Heda's still life in Van Gogh water colours
Step-by-step plan
Sumo wrestler
Step-by-step plan
Loosely painted flowers
Step-by-step plan