How to paint a girl in a field
For many people, water-mixable oil paint is something new and unusual. The properties are actually exactly the same as those of traditional oil paints. In this tutorial, we will show you that you can use Cobra oils in the a la prima technique in the same way as with traditional oils, just without using any thinners or solvents at all!
What you need:
or
- Cobra Study water mixable oil colour Titanium White (105)
- Cobra Study water mixable oil colour Primary Yellow (275)
- Cobra Study water mixable oil colour Primary Magenta (369)
- Cobra Study water mixable oil colour Ultramarine (504)
- Cobra Study water mixable oil colour Yellow Ochre (227)
- Cobra Study water mixable oil colour Burnt Sienna (411)
- Cobra Study water mixable oil colour Ivory Black (701)
- Flat (1 cm width of the hair bundle) synthetic brush
- Flat (3-4 cm width of the hair bundle) bristle brush
- Tear-off palette
- Water to dilute the paint
Tips
- Before you start, go through all the stages.
- You also can try acrylic or gouache for this step-by-step plan
Before we start
You need to prepare mixes of colours for different parts of our artwork:
- For the sky – a mix of White (105) and Ultramarine (504)
- For the field – a mix of Yellow Ochre (227) and White (105), as well as a mix of Burnt Sienna (411) and White (105)
- For a girl’s dress - a mix of Magenta, ultramarine and sienna burnt in the shade, and a mix of Magenta, yellow and sienna in the light
- The hat and hair are similar in shade, so I used common mixes for them, from Burnt Sienna (411), Yellow Ochre (227) and White (105), with the addition of Primary Magenta (369) and Primary Yellow (275) for the reflections
- A mix of Ochre (227), White (105) and little bit of Magenta (369) is perfect to paint hands.
In my work, I mixed shades with these mixes (inside the palette), for example, I add a little bit of ultramarine in the mix for the field (ochre and white) to convey green spikes and to make the color palette more harmonious.

Step 1
For the first layer mix Yellow Ochre (227) with some water to the consistency of a liquid cream. Make an outline of the horizon and the girl’s figure, but without details, at this step they are not needed.

Step 2
With a wide flat bristle brush cover the sky with a mix of Ultramarine (504) and White (105), varying the amount of white, for the diversity of sky’s color. In the following layers, try to use less water and more paint, and in the last layers don’t use water to dilute the paint at all.

Step 3
Getting to the field. Its color is also not smooth; far away it is lighter, and closer to us it becomes darker and saturated. Therefore, we will use several mixtures, and darken the tone, when it’s closer to the edge of our paper sheet.
For the field we take a synthetic flat brush, about 1 cm wide. The part of the field that is closer to the sky and horizon we will make the lightest in tone (by mixing White and a little bit of Ochre). Closer to the girl’s figure, we make the color richer, by adding some more Ochre and a little bit of Burnt Sienna to our previous mix. Closer to the edge of the paper sheet, the color of the mixture should be darker, so let’s add a bit of Ultramarine.
It’s time to add some details. We can make the left side looking warmer by adding some Red and Yellow to our basic middle color mixture. The transitional colors between light and medium I create by mixing them together.
Some White + a bit of Ivory Black will help us to create coolness to the transition between light and medium.

Step 4-7
Now we will start with girl’s figure. We start with the hair, gradually moving to the dress, hat and hands. We will use our “dark” mix for the shadows and “light” mix for the bright and light parts. Try to overlay the strokes by following the shape of the figure.

Step 8
We work further on the details with a thin brush, enhance the contrasts in the figure of the girl, add reflexes.

Step 9
Let’s add some details to the field. In the background, draw the spikelets of wheat with a thin brush, strengthen the shadows below the figure of a girl. You can also add a couple of strokes with a flat brush to make our work more dynamic.

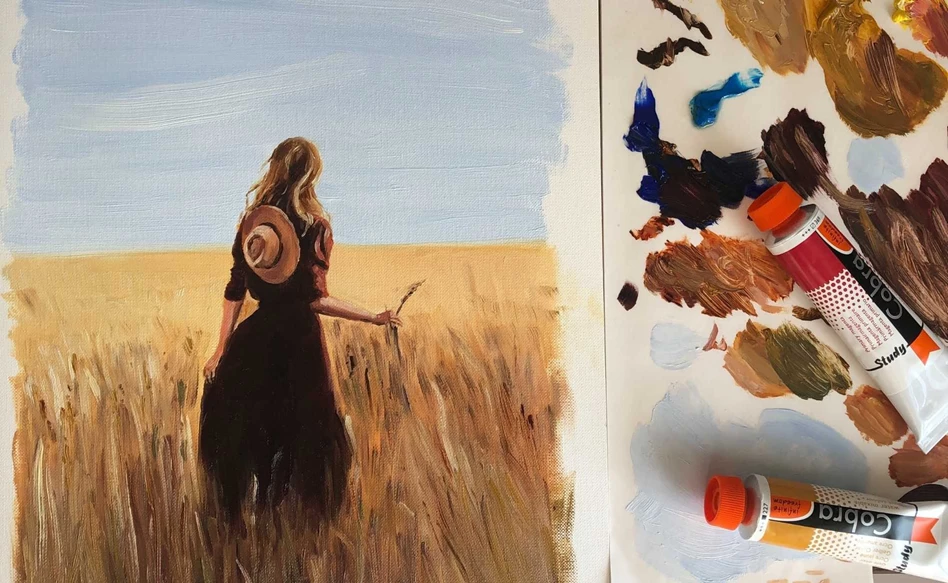
Step 10
So, we have our artwork completed. I hope my lesson was useful, and you enjoyed it!
Made for @royaltalens.eu by @mari.volkova


