Colour mixing chart
The Fineliner / Brush pens from Bruynzeel are available in 72 colours! By mixing the colours with a watercolour brush, you can make many more colours. This is how you make your creations unique!
The mixing schedule will get you started.
What you need
- Bruynzeel Fineliner Brush pens set 12 colours. You can also use colours from another set, of course!
- Bruynzeel HB pencil and eraser
- Tear-off palette or plastic sleeve containing a white A4 sheet
- Good sturdy paper, e.g. Van Gogh water colour paper 300 grams
- Watercolour brush
- Kitchen roll
- Pots of water for mixing and to clean the watercolour paintbrush during and after use
Tips
- Read through all the steps before you start
- Leave to dry thoroughly before applying the next layer
- After use, clean your water colour paintbrush thoroughly so that it remains usable for longer
Step 1
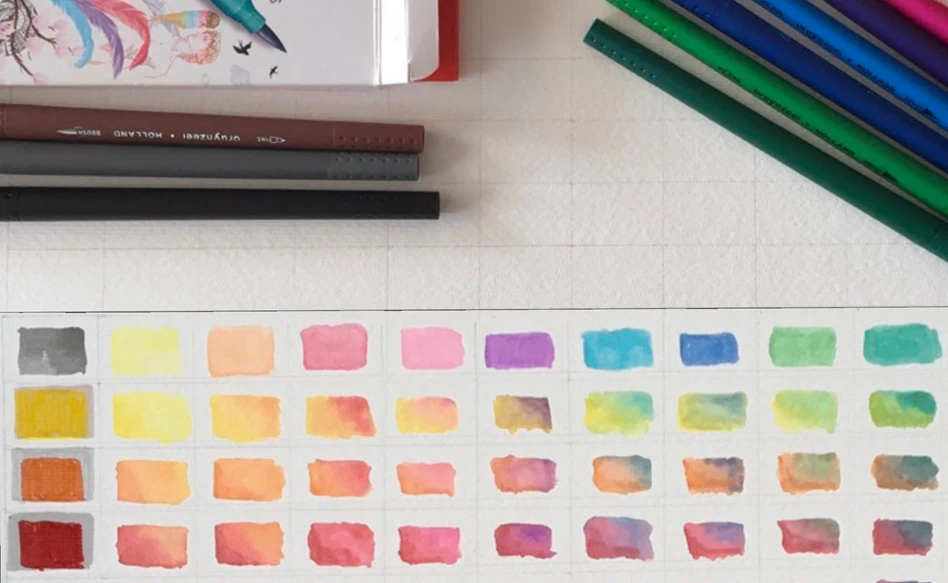
Copy the example on the water colour paper. Draw squares on good sturdy paper. Thirteen squares vertically and twelve squares horizontally. Colour the squares furthest to the left vertically with the various colours. Do this with the side of the brush.

Step 2
We are now going to apply each brush pen colour to the tear-off palette or sleeve and mix with water. We do this using the water colour paintbrush.
On a separate sheet of paper, make similar squares to those on the palette or sleeve for each colour. Then add water using the water colour paintbrush.

Step 3
Paint stripes with the brush on the tear-off palette/sleeve, as shown in the photo. Try to make some nice blends using the water colour paintbrush. You can use the kitchen paper to dry your palette.

Step 4
If you look at the first mixture, the colour yellow is applied at the bottom left. The colour yellow mixed with water is applied at the top right. You keep repeating this. So, after this apply the colour orange at the bottom left and yellow mixed with water at the top right. Dab your palette dry with kitchen paper every now and then.

Step 5
To the left, all the colours are shown vertically and at the top of the first row are all of those colours mixed with water. If you keep repeating these steps, you'll end up with this result. You now have a clear mixing chart.
The various possibilities are obvious at a glance. Have fun mixing!

Other step-by-step ideas

Drawing a turtle with Ecoline Duotip
Step-by-step plan

Drawing a Japanese beetle
Step-by-step plan

